How to Start a Travel Blog: The Ultimate Guide
If you are looking to start a travel blog from scratch, this guide will show you how. From coming up with a name and creating a logo to setting up hosting and designing the look of your website, there is a lot to consider. Don’t worry, with these blogging tips, you will be well on your way to starting your own travel blog.
Disclosure: Some of the links below are affiliate links, which means that at no additional cost to you, I may earn a small commission if you click through and make a purchase. Please note, I only recommend products and services that I know and love. Read full Privacy Policy here.
Define Your Brand
Before we get into the technical side of starting a travel blog, let’s take a step back and brainstorm the overall concept behind it. If the plan is to run your blog as a business, it’s important to differentiate yourself from other content creators in your field. In other words, you need to build a unique brand that is authentic to you.
I would first start with analysing what type of traveller you are, what aspects of travel you love the most and what unique expertise you can bring to the table. Are you a budget traveller who knows all the best travel hacks to make your money go further? Or are you into luxury resorts and international fine dining? Maybe you live for adrenaline activities or know where to find the best street food stall in any city.
Your passions and preferences will inform your blogging content. You can focus on a specific style of travel or even a single destination. There are many wildly successful blogs dedicated to specific cities and countries. Don’t worry though, there is no need to focus on a narrow niche if it doesn’t feel right. However, having a general sense of direction is helpful when you are finding your feet as a new travel blogger.
Thinking about your brand may seem a little daunting at first. But remember, you don’t need to have all the answers straight away. A deeper understanding of who you are as a creative comes through trial and error. Your brand will evolve as your travel blog grows and develops.
Consider your Target Audience
While it’s important to start your travel blog with a brainstorm of what makes you unique, you also need to consider the value you create for others. It is completely fine to set up an online diary documenting your adventures, but don’t expect this approach to translate into a successful business.
Ultimately, apart from your family and friends, nobody really cares that you have seen a beautiful waterfall or visited a high-end resort on a paradise island. Your potential readers are more concerned about how they can get to that waterfall or resort. It is important to include your personal experiences in your writing to add colour, uniqueness and authenticity to your blog. But it is also paramount to provide useful information to your audience.
Think about who your ideal reader is. For instance, are they young professionals looking to maximise their limited paid leave to see more of the world? Or are they looking at ways to become digital nomads to travel long-term? These two groups of people have overlapping interests, of course. For example, they are both likely to be after information about exciting destinations. However, they also have different needs and challenges that may require different content. You can try covering all bases, but it’s impossible to be all things to all people.
Keep your audience in mind not only when you start a travel blog, but also when you are creating content. Knowing who you are talking to and what their needs are will help you craft valuable content. This will also ensure a consistent tone of voice which is an essential part of building a strong brand.
Decide on a Name for your Travel Blog
Now it’s time to bring your project to life. The next step is to choose a name for your travel blog. Hopefully, the conceptual work on your brand identity and target audience has given you some ideas. No worries if not.
Focus on the Long-term
When it comes to choosing a name for your blog, it’s best to think long-term. It is possible to change your blog name in the future, but it is tricky and might also hurt your SEO. So, it’s best to find something that you are happy to use for years to come. For example, you may want to stay away from names like “a year in Southeast Asia” or “my 20s adventures”. What if you decide to travel for longer than a year or turn 30? With the passing of time, names like this become less relevant.
Simple Does It
Try to create a name that is simple and unique (I know, easier said than done). Avoid cliches such as “Wandering Amy” or “Nomadic John” as these names are popular amongst bloggers. Some of these may already be in use by established players in the industry (e.g., Nomadic Matt). It might be hard to forge your own brand if your blog name sounds like theirs.
When it comes to blog names, it is best to stick to something that is made up of just a couple of words so it is easy to remember. Long, complicated names may result in misspellings and loss of traffic. Also, avoid using hyphens or any other punctuation. They increase the chance of misspellings. In addition to that, based on what I’ve read, search engines are not big fans of hyphenated names. However, I have seen exceptions to that. If possible, opt for a .com rather .net, .io or regional variations.
Come up with Alternatives
I would advise on coming up with a few name options. As we transition to the next step, registering your domain name, it might turn out that your first option is already taken. I would also check if your preferred name is available of social media platforms.
One last thing I would add is don’t get stuck in analysis paralysis. Do take the time to think about it and find the option that feels right, but don’t let it stop you from actually starting a travel blog.
Register your Domain Name
To claim your corner of the internet to start a travel blog, you first need to register your domain name. A domain name is basically your website address like explorewithwonder.com or wikipedia.org. To register, you will simply need to purchase the name. This is going to be a recurring expense which will most likely cost between $10 – $20 per year.
You can purchase your domain name through a domain registrar and use a different hosting provider. Popular domain registrars include domain.com and NameCheap. Alternatively, and that’s the route I took when I set up my blog, many hosting providers include domain registration as part of their hosting packages.
When registering your domain name, you might discover that your preferred travel blog name has already been taken. This is where the alternative name options can come in handy.
Set up Hosting
Now that you have registered your domain name, you also need to “reserve” a space on the internet. Web hosting is a service that is required to obtain that space. Hosting providers offer the technology needed to effectively run your website, from the physical servers to security measures.
There are many hosting providers out there. The most popular ones amongst travel bloggers are Bluehost and HostGator. They both offer affordable hosting packages and have a good uptime rate. In other words, their servers perform well, and their clients don’t experience much downtime. They are owned by the same company, so their set up is quite similar.
To set up your hosting, you simply need to choose a plan and follow the required steps on your hosting provider’s website. The cost of hosting varies depending on the plan you choose. Starter plans for first-time clients may start at just over $2 a month. Both Bluehost and HostGator include a free domain name registration for a year as part of their package. Make sure to read the fine print to know exactly how much you’ll be paying once the promotional period ends so you don’t get caught out.
I have used HostGator from the inception of my blog and have no plans to change yet. Their support is not always perfect, but I have always managed to resolve all site issues with them in a timely manner.
Install WordPress
WordPress is the most popular content management systems (CMS) and with good reason. It is robust, versatile and intuitive. Learning all the ropes will take some time, but it is worth it. There are more powerful CMS platforms out there, but they are often a lot less user friendly than WordPress.
There are other blogging platforms such as Wix and SquareSpace. They are easy to use, and many new bloggers start with them. However, they are not robust enough for hosting websites with large volumes of content. If you are serious about building a business around your travel blog, I highly recommend going straight to WordPress.
You can set up a free account on wordpress.com, but I would advise against that. You will end up with a blogname.wordpress.com website URL rather than your own blogname.com. This will limit your ability to control your data, growth and monetisation. Instead, opt for a self-hosted WordPress account.
If you are using Bluehost or HostGator as your hosting provider, a WordPress install is normally included as part of your plan. Other hosting providers also offer this option. Just check your plan details before you sign up. Once you register with your provider, follow their instructions on how to download WordPress. It usually involves a few simple steps and takes a couple of minutes. Once the installation is complete, log into your WordPress dashboard.
Congratulations, the backend of your site is now up and running! You can now download essential plugins, choose a theme and create content.
Choose a Theme
A theme is basically a design for your travel blog. Your amazing articles need a beautiful home with a good layout. An appealing and practical design will encourage tyour users to spend more time on your blog.
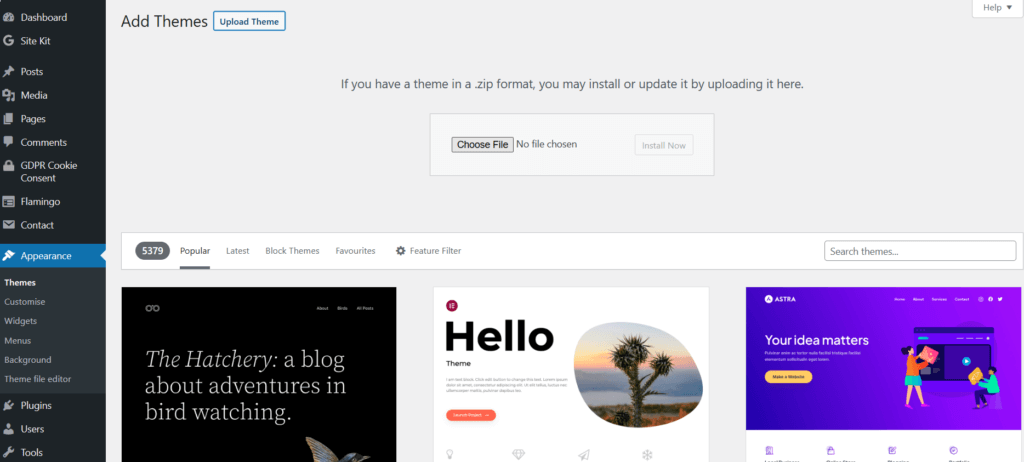
There are two types of WordPress themes – free and premium. If you are completely new to blogging, there’s no harm in trialling a free one for a few weeks. You can find these themes under the “Appearance” section in your CMS. Go into “Themes” and then just click “Add New” to see what’s available.
However, I encourage you to go for a premium theme as soon as possible. They offer better design and functionality. Opt for a responsive design, so it works well on desktop, mobile and tablet. Search engines prefer fast, mobile-friendly websites.
Premium themes come at a cost, but this investment pays off long-term. Premium themes usually cost between $20 and $100. You can find them on Theme Forest, Elegant Themes and even Etsy. Don’t sweat your choice too much. Chances are, you will use different themes throughout the lifetime of your blog.
Also, once you purchase a theme, you will get a zip file. You can upload it to your WordPress account by going to the Appearance section in your CMS. Select “Themes”, go to “Add New” and click on “Upload Theme”. You can now upload your zip file. Once it’s in WordPress, activate it and follow the installation instructions for the theme to set it all up.
Premium theme creators normally offer support. If you have any issues, you should be able to get help. If existing themes don’t float your boat; you can always hire a web developer on the likes of Upwork to create a unique design for you. This is likely to cost more though.
Create Google Analytics and Google Search Console accounts
Google Analytics is a free online analytics service that allows you to monitor your travel blog’s performance. It is an essential tool for growing your business. Without it, you will struggle to know how your site is performing. You will also find it hard to monetise your blog as this is the data your potential partners require before agreeing to work together. Signing up for Google Analytics is easy – just click on this link and follow the instructions.
Another essential tool for your travel blog is Google Search Console. It allows you to see how your site is performing in Google search, from page rankings to click through rates. This is where you can submit your sitemap and individual pages to help Google find you.
You can integrate both these services with your travel blog through the Site Kit plugin. More on this in the next section.
Select WordPress Plugins
Plugins are the building blocks of your WordPress website. They allow you to add extra features and expand functionality without having to code anything yourself. Just like themes, there are free and premium plugins. When you are starting out, opt for free essential plugins that will make your life easier. You can always graduate to the premium ones later in your travel blogging career.
To access the plugin library, go to the “Plugins” section in your WordPress dashboard. Here is a list of plugins I recommend downloading when you start a travel blog.
Recommended Starter WordPress Plugins
Akismet – helps to protect your site from spam comments.
Yoast SEO – a popular WordPress plugin to make your travel blog more search engine-friendly with a variety of features from sitemaps to article optimisation tips.
Site Kit by Google – this plugin brings data from your Google Analytics and Google Search Console accounts into a dashboard in your WordPress CMS. This allows you to keep an eye out on the high-level stats without leaving the platform.
W3 Total Cache – a caching plugin that improves your site’s speed and performance.
Grow Social by Mediavine – adds social sharing buttons to your pages.
TinyPNG – this plugin optimises your images to maintain a good website speed.
UpdraftPlus – one of the best backups and restore plugins for WordPress.
Plugins are an amazing WordPress feature and there are thousands of them on offer. But don’t go too crazy on them. Too many plugins may lead to slower load times, additional strain on server resources and increase the likelihood of errors. Some plugins may conflict with your theme or with each other.
When it comes to adding new plugins, go for quality rather than quantity. Focus on adding only the necessary plugins for optimal performance.
Create a Logo
A logo is a simple visual representation of your personal brand. You can use it not only on your site but also on your social media platforms. It helps to create a consistent online presence and stand out from your competition. The best logos are normally simple, memorable and visually pleasing. Your logo should also align the other visual branding elements, such as the design of your travel blog.
Take the time to create a logo when you start a travel blog. Research what other travel bloggers and popular brands are doing to get an understanding of what works. Try sketching out your ideas first. This approach will allow you to play with different ideas. Don’t worry, these sketches don’t need to be perfect.
Then jump into a visual tool like Adobe Photoshop or Canva to bring your logo idea to life. Personally, I use Canva. It’s a free and easy-to-use graphic design tool that provides many logo templates that will help to get you started. Remember, you don’t need to create the perfect logo from the get-go. Most well-known brands change theirs every few years. Chances are your visual identity and logo will evolve as your travel blog grows and changes.
Create Key Pages
Finally, it’s time to create some must-have pages for your new travel blog. Again, these don’t need to be perfect. They will change throughout your blogging career.
About Page
The About Page is your chance to tell your readers about yourself and your blog. Make this page engaging by letting your personality shine. Share the story of your travels and why you started the blog. Also, don’t forget what we’ve discussed earlier about adding value. The About Page is the perfect place to describe your value proposition and what your readers can get out of your blog.
Contact Page
Create a contact page so your visitors and potential collaborators can get in touch with you. Include a simple online form with fields for a name, email address and the actual message. These can be added to your site through a WordPress plugin. I use Contact Form 7. Also include the details of your social media accounts so your readers can stay in touch with you on other platforms.
Privacy Policy
This is not going to be the most fun page of your website. However, if you are planning to use tracking (e.g., Google Analytics), run display advertising and collect any user data (name, email address), it is important to create one. This shows that you are compliant with data protection regulation (e.g., GDPR). Take a look at what other bloggers have on their privacy policy pages. There are also lots of free legal templates to help you get started. Search “blogger privacy policy page templates” to see what’s out there. This is not the most exciting task, but it’s best to put it in place when you start a travel blog. Eventually, once your blog becomes bigger, you may even want to engage a legal professional to help you craft a water-tight policy.
Set up Social Media Accounts for your Travel Blog
A presence on social media platforms is an essential part of running a blog. It is also helpful for sharing your blog content and improving your search engine rankings. Facebook, Twitter, Pinterest, Instagram and TikTok are all great choices. If you are confident in your video skills, don’t forget YouTube. Use your blog name as your social profile name. This makes it easier for people to find you and creates a more consistent online presence.
Mastering all these social media platforms is not going to be easy. They are all different and getting to know how the algorithm works on each of them takes time. The good news is you don’t need to join these platforms all at once. Running a blog is work-intensive as it is, and every social media platform will create more demands on your time. This is especially important to remember if you start a travel blog while working full time.
Start off with a couple of platforms and gradually expand. Don’t give in to the shiny penny syndrome and jump from one bandwagon to another. Mastering one or two social platforms will yield much better results than starting on five at the same time and failing to get traction because you don’t have capacity to produce good quality content for all of them. Be realistic about the time you have to work on your blog and social channels.
Start Writing Blog Articles
Your travel blog is now up and running, so the next step is to get your head down and write your first blog articles. Bloggers often recommend publishing 1-2 articles a week. It’s a good cadence, but if you can’t always maintain it, don’t worry. Quality always trumps quantity.
Focus on creating detailed blog articles that add value for your readers. You can do that by providing actionable tips and guides that will make your readers’ next trip better. Also, inspire them with unique takes on popular destinations or let them discover places that they might have never heard of before. Add some personality to your content by sharing your own stories from the road and thoughts on travel in general.
Experiment with different content to understand what articles resonate the most with your audience. Highlight a destination, put together great itineraries and offer packing and travel hacking tips. If you have not travelled much yet, consider writing about preparing to travel. For example, you could focus on how to save money for travel or get ready for your first overseas trips.
Remember, writing is a skill that takes time to develop. The more you write, the better you will become. Complement your content creation efforts with reading other blogs and pieces of travel writing and you will soon be on your way to developing your own unique voice.
Implement SEO Techniques
SEO, or Search Engine Optimisation, is the process of improving your visibility on organic search results (i.e., on Google or Bing). To become a successful blogger, achieving success through this traffic acquisition channel is paramount.
I have seen many new bloggers say that SEO is something that they will concentrate later once they figure out other channels like social. Big mistake. SEO begins the moment you start a travel blog. Long term, organic search is likely to be your most valuable channel. If you gain visibility on a search engine, you will basically be able to get large volumes of traffic for free. However, it takes a lot of time and effort to get there.
SEO involves optimising your site structure, code and content to make it as friendly as possible for search engines. You will need to do keyword research to see what your potential readers are searching for and optimise your content to answer their queries. Use plugins likes Yoast SEO to help you implement SEO optimisation guidelines as you are working on your content.
SEO is both an art and a science. There is so much that goes into a successful SEO strategy that it deserves its own separate article. As you are beginning your travel blogging career, I recommend learning as much as possible about SEO. There are lots of free resources available online, so you’ll be able to get started in no time. For example, Google has its own free SEO starter guide.
Although SEO is a powerful tool for growing your travel blog, it requires patience. It may take months to see the first results. Trust me, persevering with SEO is worth it long term.
Learn as Much as Possible about Blogging and Digital Marketing
Apart from SEO, there are lots of other things that you need to learn when you start a travel blog. From social media and website management to writing skills and photography, most of us need to improve in many areas to make our travel blogs the best they can be.
Thankfully, there are lots of free and affordable blogging resources right at your fingertips. For example, Google offers free Google Analytics courses to help you navigate their powerful platform. Moz offers free SEO basics training. There are also lots of tutorials on YouTube that cover a variety of digital marketing topics.
A Note on Blogging Courses
There is a raft of online courses out there that cover everything from general blogging to specific digital marketing disciplines. Some of these course providers charge hundreds of dollars. I recommend staying cautious when considering an online course.
Some courses do contain useful information that will help you become a better blogger. However, there are also plenty of online education providers who do not offer much value in exchange for your hard-earned cash. Some of the worst courses out there simply repackage basic information freely available online.
Be especially sceptical when a Facebook or YouTube ad featuring a “blogger” in a beautiful location is trying to lure you into a free webinar. It will supposedly teach you how to get paid to travel the world. The webinar is indeed free, but there’s a catch.
The blogger starts off with a soppy story about being stuck in some dead-end job and yearning to travel. Then they tell you how through some special blogging or SEO knowledge they now make loads of money travelling the world. Then comes a 40-minute-long sales pitch to get you onto a much more expensive course. These webinars use emotional manipulation to get you to part with your money. I always wonder, if travel blogging has truly made them rich, why would they bother with these dodgy webinars?
As a rule of thumb, the more expensive the course is, the more due diligence you need to do. Find out more about the provider and the course content. Try to find independent reviews. Keep in mind though, that some bloggers may act as affiliates for the course provider, so their reviews might not be completely honest.
Network with the Travel Blogger Community
Travel blogging can sometimes feel like a lonely journey, but it doesn’t have to be. Read other travel blogs and engage with their content in a meaningful way. This will help you with content ideas for your own blog as well as keep abreast of the trends in your blogging niche.
Join networking groups on Facebook to interact with other bloggers. They are great for learning and building connections. If you have a question or an issue, you can always share it with the group. Chances are, other members have faced the same challenges and are able to provide helpful tips.
When joining a Facebook group, make sure it’s an active one where people actually interact. Sometimes these groups become a dump of links to blogs and social channels with no engagement.
You don’t have to stick to the travel niche only. Connecting with bloggers who write about other topics is incredibly useful too.
Monetise your Travel Blog
When it comes to making money, travel blogging is a slow burner. To earn a substantial income, you need to build a large audience and that takes time and effort. You might not see meaningful financial results for months if not years. However, perseverance and hard work will pay off. There are many ways to monetise your travel blog audience. The most popular ways include:
Display Advertising
This is one of the most common monetisation channels for travel bloggers. It involves hosting ad banners in different parts of your site. Nobody likes ads, but they are just a part of life. When placing them on your site, don’t go overboard. Too many ads may be frustrating for you readers. Make sure to find a good balance between content and advertising.
The most accessible advertising network is Google AdSense. It is easy to join and navigate. However, the income it provides is minimal. You may want to wait until your audience becomes larger to join a better-paying network such as Mediavine. It’s up to you to decide how you want to approach the display advertising landscape.
Affiliates
Affiliates are a great way to start monetising your blog even before you build a large audience. When you join an affiliate programme, you will receive a special tracking ID. You can add these to your blog articles when you recommend tours, hotels, travel gear, clothes and even hosting providers. If someone makes a purchase via a link with your ID, you will receive a small commission at no extra cost to the buyer.
An occasional commission from affiliate links won’t be enough to replace a full-time income. However, that money adds up over time. When placing affiliate links throughout your site, make sure that their location makes sense. Also, the products and services that you advertise should be relevant to your niche and brand.
Ideally, you should be recommending things that you know well. For example, I am a regular user of Booking.com, Amazon and Get Your Guide. These are great services, and I am happy to recommend them to my readers.
Sponsorships
Some bloggers make money with sponsored content. These may involve working with destinations, hotels and other businesses to create exciting article, photos and videos for them and promote it on your blog and social channels. These might involve paid travel opportunities as well. If you are planning to accept sponsorships, ensure that they are on brand. Also, like with other monetisation channels, don’t overdo it. If most of your content is sponsored, your audience may not feel that your blog is authentic.
Digital and Physical Products
This is an area of monetisation is only limited by your imagination. You can create digital products such as planners, Lightroom pre-sets and templates and market them to your audience. Physical products can involve anything from photo prints and stickers to clothes and jewellery. Although be mindful that the latter might involve having to store physical stock.
Providing Services
You might supplement your travel blogging by offering travel planning, social media management, copywriting or other forms of services. These can be a great source of income, but they are also time-consuming. Compared to display ads, affiliates and products, it is hard to scale this type of business activity. If you want your blog to be the main income generator, rather than a portfolio of your services, I recommend not spending too much time on this monetisation channel.
Final Thoughts
That’s it, this is how you start a travel blog from scratch. Always remember, done is better than perfect. If your dream is to start a travel blog, go for it. Take the plunge and then keep going. Don’t worry about being perfect. Becoming a successful travel blogger is not easy, but it can be incredibly rewarding. If you have any questions about this, feel free to leave them in a comment.
Frequently Asked Questions
Setting up your blog from scratch doesn’t have to be expensive. The initial set up that includes a domain registration, a hosting plan, a WordPress theme and a few other bits and pieces costs in the region of $200-$300. If you opt for premium WordPress plugins, the cost will go up. Remember, most of these costs will be recurring.
Although it seems like every man and his dog have a blog nowadays, there is always room for quality content that adds value. Most people who start travel blogs quit within a year. There are some established players out there but that doesn’t mean that new blogs can’t succeed.
Other industries are no different. For example, there are lots of restaurants out there, but that doesn’t stop new players entering the market and succeeding. Don’t worry too much about your competition. Focus on honing your unique voice and creating excellent travel content that makes your readers’ lives better. With hard work and perseverance, success will follow.
That really depends on the travel blogger and how big their website is. Some bloggers generate a 6-figure income while others may get just a couple of dollars a month. When you are at the beginning of your travel blogging journey, chances are that your blog won’t be making enough money for you to live on. However, with time, as your audience grows and you master different monetisation channels, your income will grow too.
Of course! Not all travel bloggers spend all their time on the road. Many of them have a home base. Some might even hold a full-time job. If you are not travelling now, you can write about the town or city where you live. It might not seem particularly exciting to you, but it is probably a destination for others. You can also craft content about the practical side of travel such as planning, finding deals on flights and hotels, packing lists and more.
Enjoyed this guide on how to start a travel blog? Bookmark or pin it for later.


Great article! I found the blog to be both informative and well-presented. Bravo.
Thanks Dorothy! Glad you’ve enjoyed the article